Table of Contents
medAL-hub Setup
Prerequisite
Follow the procedure given in Internet setup. At this point, you should be able to connect to the following Wi-Fi network:
ssid: health_facility_dynamic
password: Check with an administrator to have access to the password.
If your setup does not allow you to have direct access to the internet using the above network, you should still be able to connect to the following mobile network regularly:
ssid: mobile_dynamic
password: Check with an administrator to have access to the password.
Material
You will need the following material:
- Raspberry PI 4 (For convenience and ease, it will be shortened to RasPi https://www.amazon.com/dp/B07TC2BK1X
- A MicroSD card https://www.amazon.com/dp/B06XWMQ81P
- An SD card reader for the PC https://www.amazon.com/dp/B07G5JV2B5
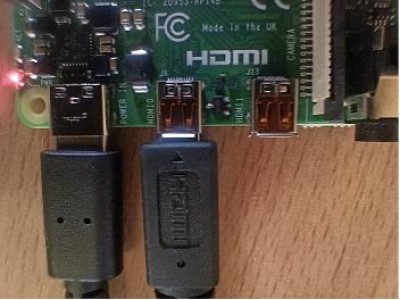
- An HDMI to micro-HDMI cable (NOT mini) https://www.amazon.com/dp/B00Z07JYLE
- A PowerBank (5Vx3A (15W) output) https://www.amazon.com/dp/B01JIWQPMW
- A Power Adapter (USB + Power) https://www.amazon.com/dp/B07K1K1F65
- An internet connection (either cable or Wi-Fi)
- A PC connected to internet, with admin rights
- A screen with HDMI connection
- A USB keyboard
SD Card Setup
First, follow these steps to setup the SD card:
- Download and open BalenaEtcher from: https://www.balena.io/etcher/
- Download the HypriotOS image: https://blog.hypriot.com/downloads/
- Plug in your SD card inside the SD card reader.
- In BalenaEtcher, click on Flash from file and select the HypriotOS image.
- Click on Select target and select your SD card.
- Click on Flash!, and wait until the flash is complete.
RasPI Setup
Follow this procedure to setup the Raspberry Pi:
- Put the SD card back in the RasPI.
- Connect the RasPI to the following:
- HDMI (0)
- Ethernet (if present)
- A Keyboard
- A Screen
- The PowerBank
- Wait until you see “login” and a blinking underscore (after about 4 minutes). That means you are ready to start. If no login then repeat steps above.

Wi-Fi Setup
Enter the credentials (press Enter between each and be careful: the keyboard is UK by default):
Username: pirate
Password: hypriot
The next step is to create the wpa_supplicant.conf file that contains the SSIDs and passwords (do not forget the –a option for the second execution of the tee command). Make sure that you already set up the router and Wi-Fi as explained in section Set up router and Wi-Fi and configure username and password: Make sure to replace <hf-wifi-password> by the default's wifi password. Check with an administrator to have access to the password.
wpa_passphrase health_facility_dynamic <hf-wifi-password>| sudo tee /etc/wpa_supplicant.conf
If you are configuring the hub for an offline facility, also add the following line: Make sure to replace <mobile-wifi-password> by the default's wifi password. Check with an administrator to have access to the password.
wpa_passphrase mobile_dynamic <mobile-wifi-password>| sudo tee –a /etc/wpa_supplicant.conf
After that, we have to give a name to each of the network configurations. In order to do that, open /etc/wpa_supplicant.conf:
sudo nano /etc/wpa_supplicant.conf
And add the two id_str lines (do not change the rest of the content):
network={
	ssid=”health_facility_dynamic”
	#psk=”...”
	psk=…
	id_str=”hf”
}
network={
	ssid=”mobile_dynamic”
	#psk=”...”
	psk=…
	id_str=”mobile”
}
Save file using 1. Ctrl-X 2. Confirm Y 3. Press Enter
After that, we have to link the wpa_supplicant.conf configuration to the wlan0 interface. Open /etc/network/interfaces:
sudo nano /etc/network/interfaces
And edit the file to make it exactly as below:
#source /etc/network/interfaces.d/*

allow-hotplug wlan0
iface wlan0 inet manual
wpa-roam /etc/wpa_supplicant.conf

iface hf inet dhcp
iface mobile inet dhcp
Save file using 1. Ctrl-X 2. Confirm Y 3. Press Enter
After that, we can activate the wlan0 interface:
sudo ifup wlan0
Make sure to save the changes and reboot:
sudo shutdown –r now
The device should now be connected to the internet. Run:
sudo ping google.com
in order to verify this. (Ctrl-C to exit ping command).
Now that the connection is established, we have to take note of some of the connection details in order to establish a connection with a static IP. Run:
ifconfig
and take note of the following values (under wlan0 interface)
- inet
- netmask
- broadcast
These values will be useful later. Run:
cat /etc/resolv.conf
And take note of the nameserver address (the first address that appears). Run:
sudo nano /etc/network/interfaces
Make the necessary changes (under hf interface):
#source /etc/network/interfaces.d/*

allow-hotplug wlan0
iface wlan0 inet manual
wpa-roam /etc/wpa_supplicant.conf

iface hf inet static
	address 178.17.54.136
	netmask 255.255.255.0
	network 178.17.54.0
	broadcast 178.17.54.255
	gateway 178.17.54.1
	dns-nameservers 178.17.54.1
iface mobile inet dhcp
Replace the relevant values with the ones from the previous step. The network value is the bitwise AND of address and netmask. The gateway value is usually the network value with a 1 at the end. The dns-nameservers address is the address that we saw in /etc/resolv.conf.
Make sure to save the changes and reboot:
sudo shutdown –r now
The connection should now be established (again).
Application Setup
Clone the repository and checkout the master branch:
git clone https://bitbucket.org/wavemind_swiss/liwi-local-data.git
cd liwi-local-data
git checkout master
Create the environment file:
cp .env.example .env
nano .env
And update the following variables:
HEALTH_FACILITY_ID=<health-facility-id>SYNC_URL=<medal-data-url>/api/v1/sync_medical_casesSERVICES_MEDAL_DATA_REDIRECT=http://<medal-hub-ip>/enroll/callbackSERVICES_MEDAL_DATA_CLIENT_ID=<auth-id-from-medal-data>
sudo nano .env
Save file using 1. Ctrl-X 2. Confirm Y 3. Press Enter
Install nginx, php and other requirements:
sudo apt update
sudo apt upgrade
sudo apt install nginx php composer php-zip php-xml php-fpm php-pgsql
Restart:
sudo shutdown –r now
In liwi-local-data, start the docker container, install pendencies and prepare the database:
docker-compose up –d
composer install
php artisan key:generate
php artisan migrate
Open the nginx configuration file:
sudo nano /etc/nginx/nginx.conf
And insert the following server block (right after the # Virtual Host Configs):
The two #include statements after the server block should be commented out.
#include /etc/nginx/conf.d/*.conf;
#include /etc/nginx/sites-enabled/*;
server {
        listen 80;
	listen 443 ssl;
        ssl_certificate /home/pirate/liwi-local-data/docker-compose/nginx/srv.crt;
        ssl_certificate_key /home/pirate/liwi-local-data/docker-compose/nginx/srv.key;
        #server_name example.com;
        root /home/pirate/liwi-local-data/public;
        add_header X-Frame-Options "SAMEORIGIN";
        add_header X-Content-Type-Options "nosniff";
        index index.php;
        charset utf-8;
        location / {
            try_files $uri $uri/ /index.php?$query_string;
        }
        location = /favicon.ico { access_log off; log_not_found off; }
        location = /robots.txt  { access_log off; log_not_found off; }
        error_page 404 /index.php;
        client_max_body_size 0;
        location ~ \.php$ {
            fastcgi_pass unix:/var/run/php/php7.3-fpm.sock;
            fastcgi_param SCRIPT_FILENAME $realpath_root$fastcgi_script_name;
            include fastcgi_params;
        }
        location ~ /\.(?!well-known).* {
            deny all;
        }
    }
We can verify that the nginx configuration is valid using the following command:
sudo nginx -t
After that, we have to change the permissions of the project folder so that each component of the application (the web server and the database) can access the required files:
sudo chown -R pirate:pirate /home/pirate/liwi-local-data
sudo chown -R www-data:www-data /home/pirate/liwi-local-data/storage
sudo chown -R root:root /home/pirate/liwi-local-data/postgres-data
sudo usermod -a -G www-data pirate
Restart the docker container:
docker-compose down
docker-compose up -d
Restart nginx:
sudo systemctl restart nginx
Go to http://<server-ip>/ and make sure the server is running. Finally, enroll your device into medAL-data. To do so, follow this procedure:
- Visit http://<server-ip>/enroll.
- Click on
Enroll. - A new windows will open on medAL-data. Login with your credentials.
- Click on
Authorize. - Click on
Enroll.
Your medAL-hub is enrolled and should be able to send data in a secure way to medAL-data.
medAL-hub Maintenance Setup
Update Script
We are now going to create a script to update the application from the git repository:
touch ~/update.sh
chmod +x ~/update.sh
nano ~/update.sh
The content of the script should look like this:
#!/bin/sh
cd /home/pirate/liwi-local-data
docker-compose down
git pull
docker-compose up -d
composer install
php artisan key:generate
php artisan migrate
Crontab Setup
We need to configure cron jobs so that Laravel can run synchronization jobs and that the update script gets executed everyday. Open crontab:
sudo crontab –e
And add the following jobs:
* * * * * php /home/pirate/liwi-local-data/artisan schedule:run
30 16 * * * /home/pirate/update.sh >> /home/pirate/update.log 2>&1
The exact time of the update can be adjusted based on the health facility requirements (in this example it is set to update at 16:30 everyday).
Sync Configuration
Open the configuration file for synchronization:
sudo nano config/synchronization.php
And choose the appropriate configuration options.
offline_modeanddaily_sync_time- Choose
falseforoffline_modeif a reliable connection is expected to be available throughout the day. In that case, the hub makes one attempt of pushing the cases to main data every day at a fixed time. The exact time at which the synchronization happens can be configured withdaily_sync_time. - Choose
trueif a reliable connection is only available from time to time, e.g. during a few minutes each day. In that case, the hub will attempt to push the cases as soon as a connection can be established with the main data server.
sync_urlandsync_domain- These values are used to reach the main data server.
offline_outofsync_thrandonline_outofsync_thr- This value is the number of hours after which the cases are considered out-of-sync (starting from creation time). Synchronization will be triggered as soon as any closed case is out-of-sync and connection is available. The value for online mode should to be much higher than the one for offline mode because a reliable connection is expected to be available in online mode. For this reason, cases in online mode only become out-of-sync when the daily scheduled synchronization cannot take place for some reason.
Synchronization Using a Mobile Hotspot (Offline facilities)
In the case where no connection is available at the health facility, it is possible to perform a synchronization with the help of a mobile phone with a mobile internet connection that can act as a hotspot. The procedure is the following:
- Check that the hotspot is already configured with the ssid and the password specified in
wpa_supplicant.conf. The raspberry will automatically connect to a network with this configuration. - As soon as the connection is established, the hub will push the cases to the main server.
- In order to make sure that the transaction completed successfully, logs are available under
liwi_local_data/storage/logs/laravel.log:
sudo nano liwi-local-data/storage/logs/laravel.log
You should see at the end of the export:
Upload successful!